Are you the proud owner of a new rotary valve? The best way to keep your valve happy (and efficient) is regular maintenance. That could include cleaning, checking rotor tolerances, and replacing the shaft seals, rotor, or bearings.
Or all of the above. In any case, you’ll need to access the valve’s internals by removing the endplate.
All of this can be done quickly and easily with a set of common hand tools. Once you get the hang of it, you can disassemble a valve in less than 5 minutes.
Tools to use:
- Allen wrench (AKA hex key)
- Drift pin
- Flat head punch or file
- Socket wrench
- Gear puller (AKA wheel puller)
- Rubber mallet (optional)
How to remove a rotary valve endplate
Step 1: Pick a side
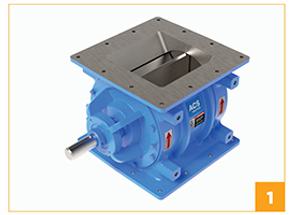
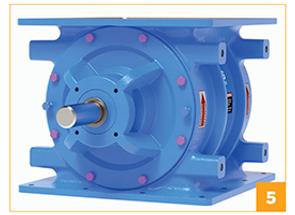
Depending on what you want to do, you’ll remove either the drive-side endplate, the tail-side endplate, or both. The drive side is pictured here, but don’t worry — the process is similar on both sides.
Most of the time, it’s easier to choose the tail-side or non-drive end, because then you won’t have to remove the drive.
Step 2: Remove the bearing lock collar
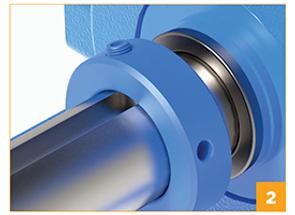
To remove the bearing lock collar, first use an Allen wrench to take out the set screw. Then rotate the collar by hand to loosen it.
Insert a drift pin into the non-threaded hole, then tap it with a hammer to rotate the collar. Now you can slide the collar off the shaft.
Step 3: Flatten the mark
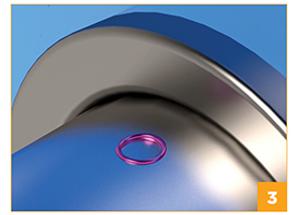
Once the bearing lock collar is off, you’ll see a round mark on the shaft where the set screw used to be. Use a flat head punch to flatten the mark.
This will ensure the mark doesn’t interfere with the process as you continue.
Step 4: Loosen the shaft seal lock collar
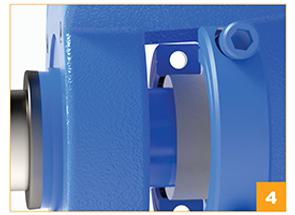
If your valve comes equipped with an ACST-4 shaft seal, you need to loosen a second lock collar that clamps the Teflon seal to the shaft. Use a 1/4'’ Allen key (5/16’’ for larger valves) to loosen the screws around the lock collar and remove it.
For valves with a “push type” seal assembly, loosen the pusher nuts to allow the pusher to retract from the Teflon packing.
Step 5: Take out the bolts
Remove the bolts that go all around the circular rim of the endplate. You can do this by loosening the bolts with a socket wrench and then removing them by hand.
Step 6: Remove the endplate
Attach a gear puller behind the bearing housing. Tighten it slowly until the cover moves away from the housing. If the cover tends to bind on the shaft, tap the puller bolt with a rubber mallet as you tighten. Then remove the endplate, and you're done!
Note that larger valve sizes have threaded holes to install jacking bolts.
What’s next?
You showed that endplate who’s boss. Now that your rotary valve is opened up, you can access the internals and perform any maintenance or repairs you need.
If you need a recap at any point, we also have a quick video showing the process:

What will you do next? Check out these videos to learn a few more tricks:
- Checking your rotor-to-housing clearance for NFPA compliance
- Replacing ACST-4 shaft seals
- Putting your valve back together
We hope that helps! If you run into any issues with the maintenance process or have more questions about our rotary airlock valves, reach out to ACS Valves any time.